Downloads & Installers
How to flash an SD card
You don't have to! Using the Toradex Easy Installer, the process of flashing an OS to your board is painless and straightforward! Checkout Toradex's offerings below.
OS comparison
Table comparing the Yocto approach to the Torizon approach.
This documentation is being worked on and will be available soon.
What is Torizon?
Torizon is a new Linux-based software platform that simplifies the process of developing and maintaining embedded software. It allows you to configure the system for your use case quickly and easily, so you can focus on application development instead of Linux builds. Checkout the Torizon Documentation to learn more!
What is the Toradex Easy Installer?
The Toradex Easy Installer is a Linux-based application with a Graphical User Interface, among its features are:
- Allows users to install a selection of Operating System images into the internal flash memory of Toradex modules in an extremely simple way.
- Comes pre-installed in all newer Toradex System on Modules.
- Is suitable for fully automated volume production as it allows for no-touch installation of custom images.
- Features a handful of configuration options for advanced users such as pre-install and post-install script execution and customized partitioning schemes.
Supported Modules
See the Toradex Easy Installer releases.
Getting Started with Toradex Easy Installer
In this section, we will take the first steps towards installing Toradex images with Easy Installer.
Before you start, you need to have the tool loaded in the SoM memory.
- If the module is in the factory default status: For most of the modules, Toradex Easy Installer is flashed in the factory as the default image. In these modules, you don't need to load the tool if this is the first time you use the unit. You will be able to see the tool's interface on your screen after booting the module for the first time.
- If your module already has an Operating System flashed: If your module already have an Operating System and you want to install another OS, you can download an Easy Installer image and load Toradex Easy Installer into the module's RAM through a host computer over USB OTG. See the Load Toradex Easy Installer article for instructions.
Requirements
To use the Toradex Easy Installer you will need:
- A supported Toradex Computer on Module.
- (optional) if Easy Installer is not installed in your module, you need to manually Load Toradex Easy Installer. If you are unsure, just boot the board and see what comes up on the display and the serial port debug console.
- (optional) Toradex provides pre-built, ready-to-use images in our online feeds. Some of them are meant for evaluation, as our Partner Demo Images and our Reference Images for Yocto Project, others for production, as Torizon. If you have a custom image, or cannot use our online feeds, you will need an image. Read further on the section Providing the Images to learn more about it.
Displaying the GUI
Using the Display Output
Once the Toradex Easy Installer is loaded into RAM, you should see a User Interface appearing on the DVI-I/HDMI, VGA, or on the parallel RGB (Unified Interface Display) ports of your carrier board (obviously a display must be connected at that port).
For Easy Installer 2.0 releases and newer, currently, the default outputs are:
- DVI-I/HDMI port on Apalis
- RGB with VGA resolution on Colibri
- HDMI through the Verdin DSI to HDMI Adapter on Verdin.
HDMI hotplug is not supported. You must connect the HDMI cable with the board powered off and only then power it on.
Using a Remote Desktop
If you can't use any of these display options, you can access the user interface remotely over the network using VNC.
For this, you should connect a USB cable to the USB / OTG port of your carrier board. The module provides a connection via USB RNDIS with the default IP address of 192.168.11.1.
The USB / OTG port we refer to is the same one used to enter recovery mode. Refer to the article iMX Recovery Mode to find the correct port for your carrier board.
Alternatively, you can use the IP address of the ethernet interface, which will depend on the DHCP server serving your LAN.
Use your preferred VNC client to connect to this address. For example:
$ vncviewer 192.168.11.1
For Windows 10, we recommend using TightVNC. For Linux, we recommend Vinagre.
Providing the Images
Online installation (preferred): this is the easiest method. To list images from the Internet, make sure that you connect the board via Ethernet to a network that provides Internet access (the installer relies on DHCP to configure the IP address and HTTP to download images). After some seconds you should see a list of images appearing.
Offline installation: alternatively, if you cannot connect the board directly to the internet, you can download Toradex OS and partner demo images from our website and unzip/untar it onto an SD Card or USB Flash Drive. Once you plug it into the board, the images should appear in the list of available images with an icon indicating that it is found on a local storage device.
Please insert the SD card in X19 (SD/MMC 4 bit) if you are using Apalis TK1 with Apalis Evaluation Board
Installing the Images

To install an image, use a USB mouse to select and press the "Install (i)" button.
You can also use a USB keyboard only: Use the arrows to select the image and press "i" to start the installation. Follow the instructions until installation begins.
After the image has been successfully installed you should see the following message on your screen:

At this point, all data have been stored on internal flash and caches have been flushed (synced). It is not required to click on any of these three buttons, it is perfectly fine to just reset or turn off the system.
Enabling the Toradex CI Feed and Adding Your Own Feeds
Also, it is good to remember that if you want to add more sources to Toradex Easy Installer (like adding your own server into it), make sure to hit Feeds button.
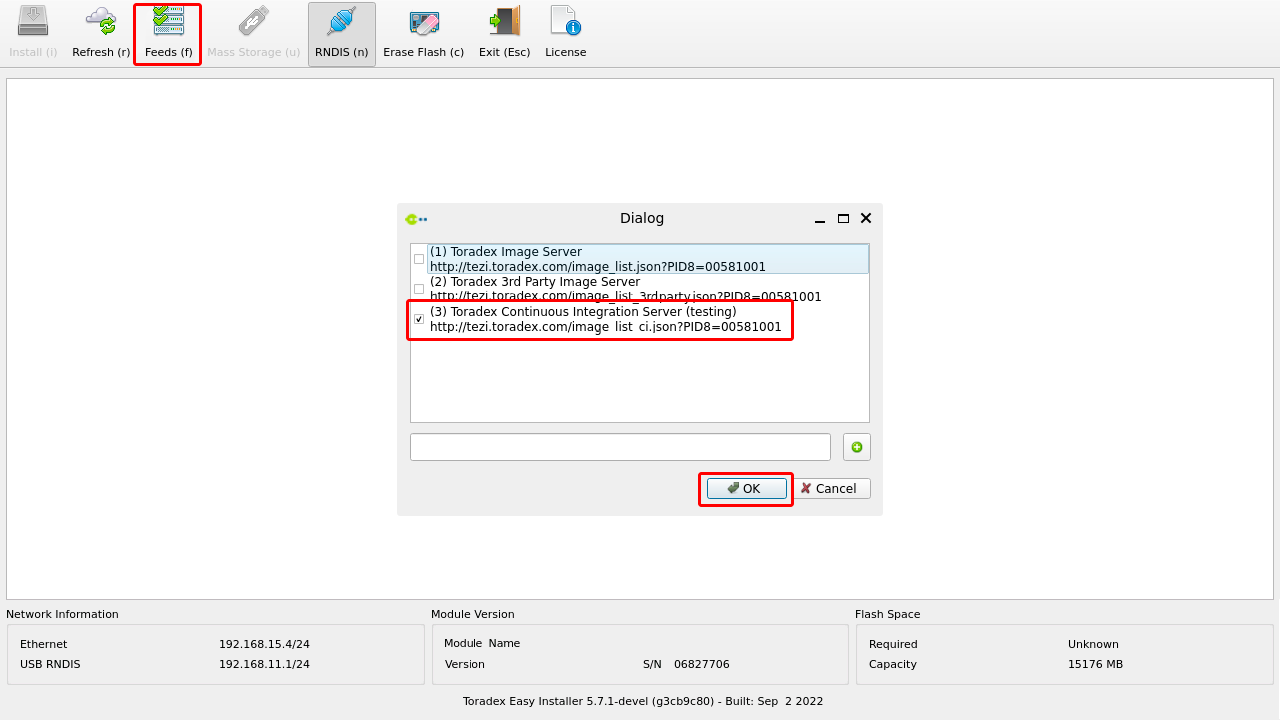
A simple test can be done by allowing the Toradex Continuous Integration Server (testing) option.
Offline Images Download
For all available images, visit Toradex Download Links (Torizon, Linux BSP, WinCE and Partner Demos).